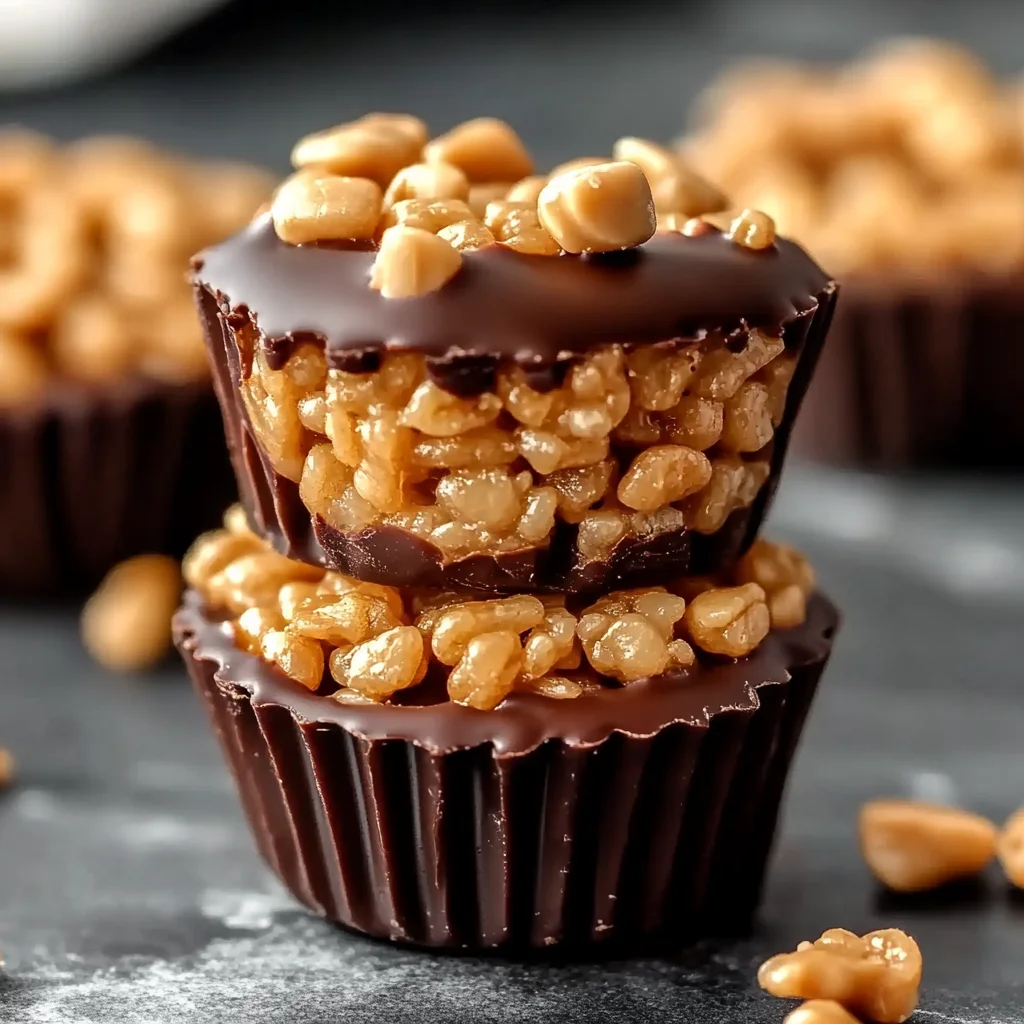
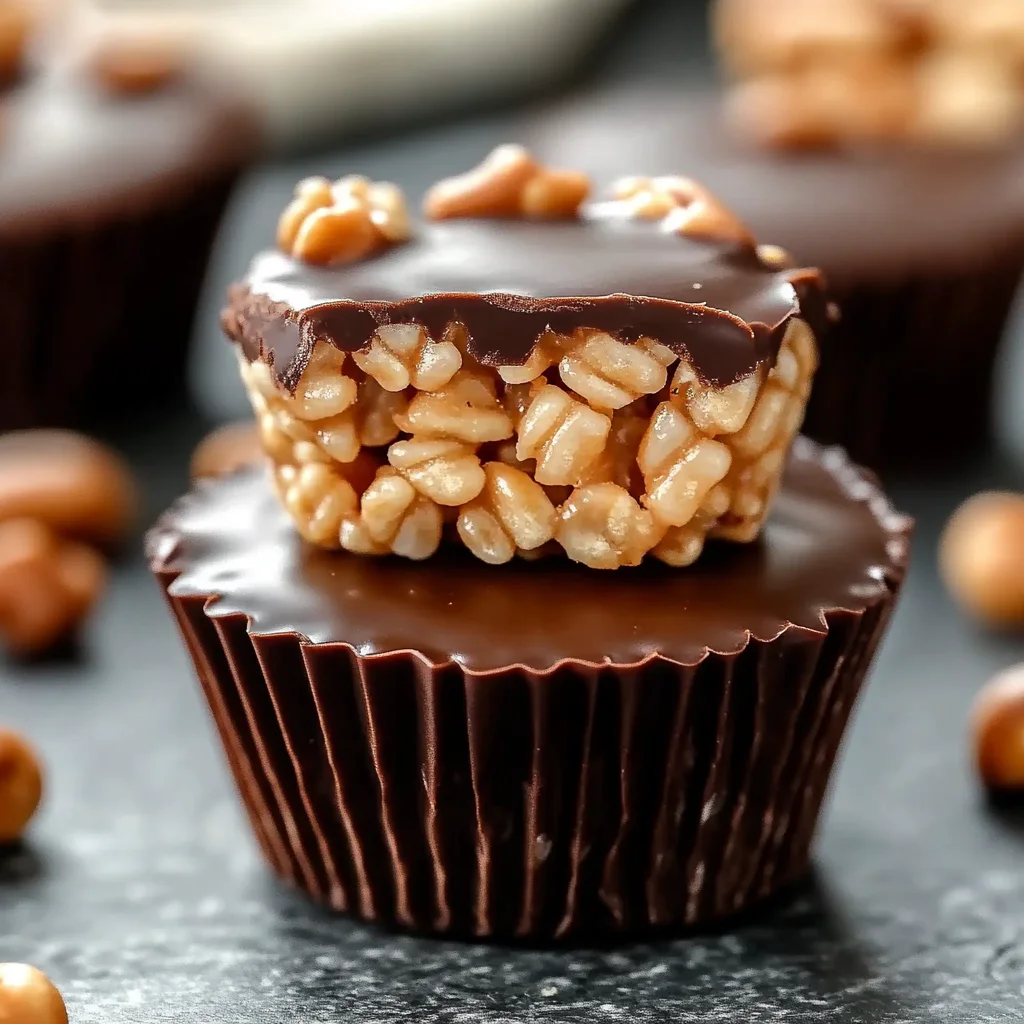
Chocolate Peanut Butter Rice Krispie Cups
Quick, easy, and irresistibly delicious, these no-bake Chocolate Peanut Butter Rice Krispie Cups are the ultimate treat! The perfect balance of creamy peanut butter, rich chocolate, and crispy Rice Krispies creates a snack everyone will adore. Whether for parties, family gatherings, or a sweet pick-me-up, these cups are guaranteed to satisfy your cravings!
Why You’ll Love This Recipe
- No-Bake Delight: These cups require no baking at all, making them perfect for quick preparation.
- Irresistible Flavor: The combination of creamy peanut butter and rich chocolate makes every bite heavenly.
- Versatile Treat: Great for any occasion—be it a birthday party or just a cozy night in.
- Kid-Friendly: Kids can help make these treats, making it a fun cooking experience for the whole family.
- Customizable Options: Feel free to add nuts or swap chocolate types to suit your taste.
Tools and Preparation
To successfully whip up these Chocolate Peanut Butter Rice Krispie Cups, you’ll need some essential tools. Gathering everything beforehand will ensure a smooth cooking process.
Essential Tools and Equipment
- Muffin tin
- Paper liners
- Medium saucepan
- Mixing bowl
- Wooden spoon or spatula
- Microwave-safe bowl
Importance of Each Tool
- Muffin tin: This is crucial for shaping your cups into perfect little treats.
- Medium saucepan: Ideal for melting butter and marshmallows uniformly without burning.
- Mixing bowl: A must-have for combining ingredients effectively.
Ingredients
For the Cups
- 3 cups Rice Krispies cereal
- 1 cup creamy peanut butter
- 1/2 cup unsalted butter
- 1 cup mini marshmallows
For the Topping
- 1 cup chocolate chips
- 1/2 tsp vanilla extract (optional)
- Pinch of sea salt (optional)
How to Make Chocolate Peanut Butter Rice Krispie Cups
Step 1: Melt the Base
In a medium saucepan over low heat, melt the butter and mini marshmallows, stirring consistently until smooth.
Step 2: Add Peanut Butter
Stir in the creamy peanut butter and vanilla extract (if using) until fully combined and creamy.
Step 3: Mix with Cereal
Pour the Rice Krispies cereal into a large bowl. Add the peanut butter mixture and gently fold until all the cereal is coated evenly.
Step 4: Shape the Cups
Line a muffin tin with paper liners. Spoon the mixture evenly into each cup and press down gently to form a flat surface.
Step 5: Add Chocolate Layer
Melt the chocolate chips in a microwave-safe bowl using 20-second intervals, stirring in between. Spoon melted chocolate over each cup and spread evenly. Sprinkle with sea salt if desired.
Step 6: Set & Serve
Allow the cups to cool at room temperature for 20 minutes or place them in the refrigerator to set faster. Once firm, remove the paper liners and serve!
How to Serve Chocolate Peanut Butter Rice Krispie Cups
These delicious Chocolate Peanut Butter Rice Krispie Cups are perfect for any occasion. Their fun presentation and rich flavors make them a hit at parties, movie nights, or as a sweet surprise in lunchboxes.
For Parties
- Platter Presentation: Arrange the cups on a decorative platter for an eye-catching display that will entice your guests.
- Themed Decor: Use themed liners or topping sprinkles to match your party’s theme, adding a festive touch.
As Snack Packs
- Individual Wrapping: Wrap each cup in plastic wrap for easy grab-and-go snacks, perfect for school lunches or road trips.
- Mix and Match: Pair with fresh fruit or yogurt cups for a balanced snack option.
For Movie Nights
- Cinematic Treats: Serve alongside popcorn and candy for a fun movie night experience that everyone will love.
- Personal Bowls: Offer individual bowls filled with cups for a relaxed viewing experience.
How to Perfect Chocolate Peanut Butter Rice Krispie Cups
Creating the ultimate Chocolate Peanut Butter Rice Krispie Cups is simple with these helpful tips. Follow these suggestions to enhance flavor and texture.
- Use Fresh Ingredients: Ensure all ingredients, especially marshmallows and peanut butter, are fresh to achieve the best taste and texture.
- Melt Slowly: Melt butter and marshmallows over low heat to prevent burning, ensuring a smooth mixture.
- Don’t Overmix: When combining the cereal with the peanut butter mixture, fold gently to keep the Rice Krispies crispy.
- Chill Before Serving: Allow the cups to chill in the fridge for at least 20 minutes before serving for easier handling and better texture.
Best Side Dishes for Chocolate Peanut Butter Rice Krispie Cups
These delightful cups pair well with various side dishes that complement their flavors. Here are some great options:
- Fresh Fruit Salad: A mix of seasonal fruits adds brightness and balance to the rich cups.
- Yogurt Parfaits: Layered yogurt with granola provides a creamy contrast while enhancing nutrition.
- Veggie Platter: Crisp vegetables served with hummus offer a crunchy, healthy option alongside the sweet treat.
- Cheese Board: A selection of cheeses can create an appealing savory contrast to the sweetness of the cups.
- Chocolate-Dipped Strawberries: These add extra indulgence while keeping it light and fruity.
- Ice Cream Sundae Bar: Set up a sundae station where guests can create their own desserts featuring the rice krispie cups as toppings.
Common Mistakes to Avoid
When making Chocolate Peanut Butter Rice Krispie Cups, it’s easy to slip up. Here are some common mistakes and how to avoid them.
- Not measuring ingredients accurately: Ensure you measure your Rice Krispies and peanut butter precisely. Too much or too little can affect the texture.
- Skipping the low heat: Melting butter and marshmallows on high heat can lead to burning. Always use low heat for a smooth mixture.
- Overmixing the cereal: Gently fold the Rice Krispies into the peanut butter mixture. Overmixing can crush the cereal, making your cups less crispy.
- Neglecting to cool properly: Allowing the cups to cool at room temperature is essential for them to set. Rushing this step can result in a gooey mess.
- Using cold chocolate: If your melted chocolate is cold when added, it might not spread well. Ensure it’s warm and smooth for an even layer.
Storage & Reheating Instructions
Refrigerator Storage
- Store in an airtight container.
- These cups last up to one week in the fridge.
Freezing Chocolate Peanut Butter Rice Krispie Cups
- Wrap each cup individually in plastic wrap.
- Place them in a freezer-safe container or bag for up to three months.
Reheating Chocolate Peanut Butter Rice Krispie Cups
- Oven: Preheat to 350°F (175°C). Wrap cups in foil and heat for about 5-10 minutes.
- Microwave: Warm on low power in 10-15 second intervals until just soft.
- Stovetop: Use a pan over low heat, covering it with a lid for about 5 minutes until warm.
Frequently Asked Questions
What are Chocolate Peanut Butter Rice Krispie Cups?
Chocolate Peanut Butter Rice Krispie Cups are a no-bake dessert made with crispy rice cereal, creamy peanut butter, and rich chocolate. They are easy to make and perfect for any occasion.
How long does it take to make Chocolate Peanut Butter Rice Krispie Cups?
The total time for making these cups is around 20 minutes, including prep and cooling time. It’s a quick treat you can whip up any time!
Can I customize my Chocolate Peanut Butter Rice Krispie Cups?
Absolutely! You can add ingredients like nuts, dried fruit, or different types of chocolate for variety and personal taste.
Are there any alternatives for peanut butter?
Yes! If you’re allergic or prefer something different, almond butter or sunflower seed butter work well as substitutes in this recipe.
How do I store leftovers?
Leftover Chocolate Peanut Butter Rice Krispie Cups should be stored in an airtight container in the refrigerator for up to one week or frozen for longer storage.
Final Thoughts
These Chocolate Peanut Butter Rice Krispie Cups are not only delightful but also incredibly versatile. Feel free to experiment with flavors or toppings that suit your taste buds. Whether you share them at gatherings or enjoy them solo as a sweet treat, they are sure to bring joy!
Chocolate Peanut Butter Rice Krispie Cups

Indulge in the delightful goodness of Chocolate Peanut Butter Rice Krispie Cups, a no-bake treat that’s as simple to make as it is delicious! In just 20 minutes, you can create these mouthwatering cups that perfectly blend the creaminess of peanut butter with the richness of chocolate and the satisfying crunch of Rice Krispies. Ideal for parties, family gatherings, or a sweet snack at home, these cups are not only easy to whip up but also customizable to suit your tastes. Get ready to impress your friends and family with this irresistible dessert that everyone will love!
- Prep Time: 10 minutes
- Cook Time: 10 minutes
- Total Time: 20 minutes
- Yield: Approximately 12 servings 1x
- Category: Dessert
- Method: No-Bake
- Cuisine: American
Ingredients
- 3 cups Rice Krispies cereal
- 1 cup creamy peanut butter
- 1/2 cup unsalted butter
- 1 cup mini marshmallows
- 1 cup chocolate chips
Instructions
- In a medium saucepan over low heat, melt the butter and mini marshmallows until smooth.
- Stir in creamy peanut butter until fully combined.
- In a large bowl, mix Rice Krispies cereal with the melted mixture until evenly coated.
- Line a muffin tin with paper liners and spoon the mixture into each cup, pressing down gently.
- Melt chocolate chips in a microwave-safe bowl and drizzle over each cup; spread evenly.
- Allow to cool for about 20 minutes or refrigerate until set before serving.
Nutrition
- Serving Size: 1 cup (45g)
- Calories: 190
- Sugar: 10g
- Sodium: 100mg
- Fat: 10g
- Saturated Fat: 4g
- Unsaturated Fat: 5g
- Trans Fat: 0g
- Carbohydrates: 21g
- Fiber: 1g
- Protein: 3g
- Cholesterol: 15mg